Let's Learn About Retrographer
Lens : Focus Settings
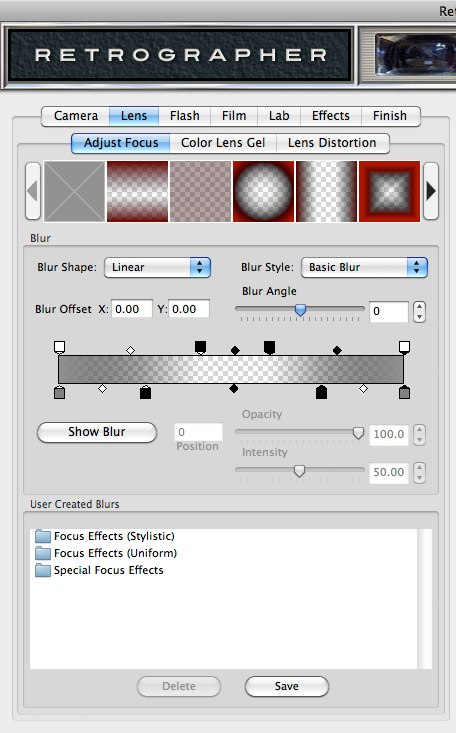
What good is a camera without a great lens? The Lens tab is loaded with so many amazing lens effects that we had to create sections within it! By default, any time you click the Lens tab, you'll always be taken directly to the Adjust Focus section.
|
Select Your Lens
- Lens Preset Picker - The first thing you may want to do is choose from our default lens preset focus effects you'd like to start working with. To do so, simply click the desired lens focus preset effect you'd like to use from the filmstrip picker by clicking on it. Click the arrows to the left and right of the picker to browse through the focus effects or to remove the focus effect, just click the grey box icon in the far left of the picker. The red areas within each thumbnail show where the blurriest part of the lens focus is applied.
* NOTE - We've created loads of amazing blur presets, so if you can't find what you're looking for in the preset picker, check out the presets in the User Create Blurs area for plenty of great options!
Adjust the Lens Blur
Since blurs come in all shapes and sizes, we've given you the ability to adjust exactly how and where the blur is applied to your image.
- Blur Shape - Simply click the dropdown box to select the shape of the blur you'd like to apply to you image or select None to remove the blur effect. All other blur controls will remain disabled until a blur shape has been selected.
- Blur Style - Click the dropdown box to select the type of the blur you'd like to apply to you image. By default you can choose from our Basic Blur effect to more advanced and creative blur styles. Note that only one blur Style can be applied at a time to a Lens but you can add multiple Lenses to an image.
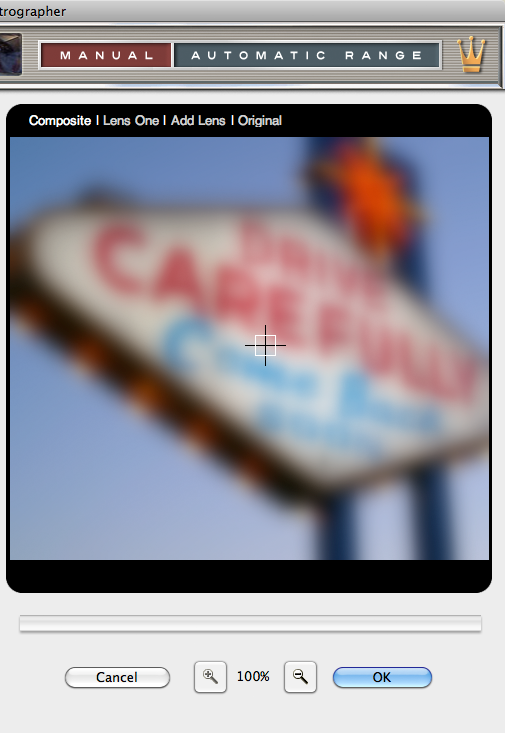
- Blur Offset - If you look in the preview window, you'll notice a small crosshair icon which indicates the center of the blur effect. To modify the position of the blur effect on your image, hold down the Command (Apple) key (or the Ctrl key on Windows) then click and drag the crosshair icon within the Preview window. For more precise control, you may also adjust the numbers in the X and Y coordinate boxes respectively.
- Blur Angle - By default, the blur angle is set at zero but can be easily rotated incrementally up to 180 degrees in either direction. As the slider control is adjusted, the blur will rotate accordingly.
- Blur Editor - Drag any node or sub-node above or below the blur editor area to reposition the opacity or intensity location within the blur effect. To add a new node, click just above or below the blur editor and it will appear on the editor. To remove a node, simply click and drag the node away from the blur editor. Refer to the position, opacity and intensity control just below the blur editor to fine-tune the node settings.
- Show Blur - It's downright difficult to edit something you can't see easily, so we created a show blur button which will clearly show you where the blur is present on your image. Simply toggle the blur visibility on and off by clicking the Show Blur button.
Create Your Blur
We set out to create the easiest and most powerful blur editor we could design to give you complete control over every blur you make! The blur editor is deceptively simple to use but may look a bit confusing at first if you aren't familiar with this type of editor. To get you started creating your own blur effect, we'll take you through it step-by-step.
- Reset the Blur Nodes - To start, simply click the No Blur preset (grey box thumbnail on far left) from the Lens Preset Picker.
- Select a Blur Shape - Click the Blur Shape dropdown menu and select a blur shape you'd like to work with.
- View the Blur - Click the Show Blur button so you can see where the blur will be applied to make it easier to start.
- Adjust the Top Nodes - Click on any node above the blur editor and adjust opacity level on the Opacity slider below. This controls the amount of blur used in a specific area of the image.
- Adjust the Bottom Nodes - Click on any node below the blur editor and adjust intensity level on the Intensity slider below. This controls the strength of the blur effect in a specific area of the image.
- Adjust Nodes - Simply click to add new nodes or drag to change the position of or remove existing nodes to see how they effect your blur. You can also drag the smaller sub-nodes located on the blur editor to change the stress of the blur. Also, toggle the Show Blur button off and adjust the node opacity and intensity controls to see exactly how they function.
- Fine-Tune Your Blur - From there, you can adjust the Blur Angle or Style and even pick a different Blur Shape to change the look of your blur. If you want to create multiple blurs, simply click the Add Lens tab to create a second lens and blur effect.
User Created Blurs - The User Created Blurs dialog allows you to save or apply previously saved blur settings to the image you're working with, and we've created a nice batch to get your started. Once you've created a blur effect setting you like, click the Save button, name the setting and click OK to save this setting. To recall and apply a setting, simply click on the setting name in the dialog box. To delete a setting, simply click its name in the dialog box and click the Delete button.
Working with the Preview Window
- Preview Options - Above the Preview window at right, you'll notice some viewing options. By default the Composite option is selected to show you what all combined tabbed section effects look like applied to the image. At any time you can click the Original option to toggle between the unaffected image and a preview of the filtered image with all effects applied.
- Preview Options - Lens Multiplier - By default you are only working with a single lens effect (Lens One), by clicking the Add Lens option, you can now define an additional lens effect with its own settings (Lens Two). You can easily toggle between each lens effect by clicking Lens One or Lens Two or click Composite to view the fully composited preview with both Lens effects applied in addition to all combined tabbed section effects. At any time you can delete either lens effect by clicking the red close box icon to the right of the lens name.
- Magnifying the Preview - Below the Preview window, you'll see the magnification controls. By clicking the appropriate icon (- or +), you can increase or decrease the magnification of the Preview window. The current level of magnification is shown between the magnification icons.
- Moving the Preview - When you have increased magnification and wish to view the texture effect on the rest of the image not visible in the Preview window, simply move your mouse into the Preview window and click and drag your image around to reveal the texture effected image.
- Re-positioning the Lens Effect - To modify the position of the lens effect on your image, hold down the Command (Apple) key (or the Ctrl key on Windows) then click and drag the crosshair icon within the Preview window to adjust the center of the effect.