Let's Learn About Retrographer
Film Settings
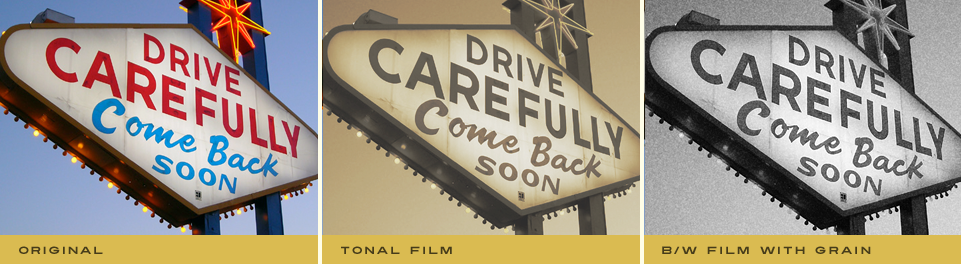
You've got the full camera outfit, now it's time to put it on the perfect film! With a full range of films from black and white to tonal stocks to choose from each with its own grain and levels, you'll blush when you discover that every film stock you can imagine fits in one tiny section!
|
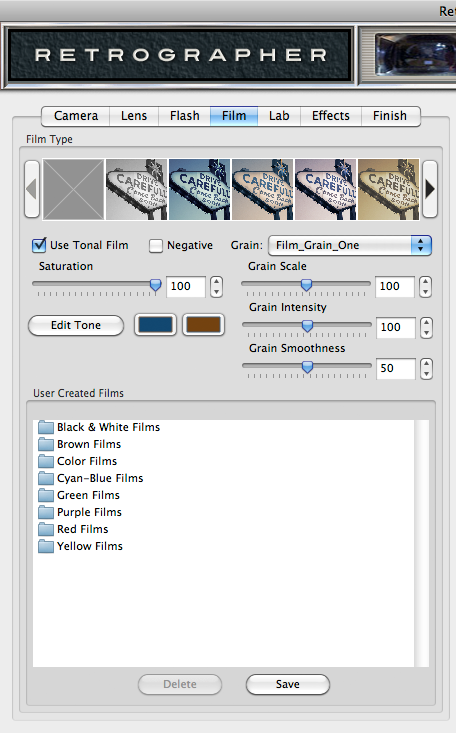
Select Your Film
- Film Preset Picker - The first thing you may want to do is choose from our default preset film stocks you'd like to start working with. To do so, simply click the desired film stock preset you'd like to use from the filmstrip picker by clicking on it. Click the arrows to the left and right of the picker to browse through the film preset effects or to remove the film stock effect, just click the grey box icon in the far left of the picker.
* NOTE - We've created loads of amazing film presets, so if you can't find what you're looking for in the preset picker, check out the presets in the User Create Films area for plenty of great options!
Adjust the Film Tone
By default, we define the film as full color unless otherwise selected as a tonal film which gives you complete control over how the film type renders the image.
- Use Tonal Film - After you have enabled this feature by clicking the checkbox, you'll notice your image is now re-defined by the color swatches just below it.
- Negative - By enabling this option, it simply defines the film as negative rather than positive and renders the image accordingly.
- Saturation - Once the Use Tonal Film option has been enabled, the saturation control also becomes editable. When slid to the far right, it will render fully saturated color tones based on the colors defined just below. By adjusting the slider to the far left, the image becomes fully desaturated and is now considered a grayscale tonal image, perfect for black and white style photography.
- Edit Tone - Anytime a tonal film stock is introduced,
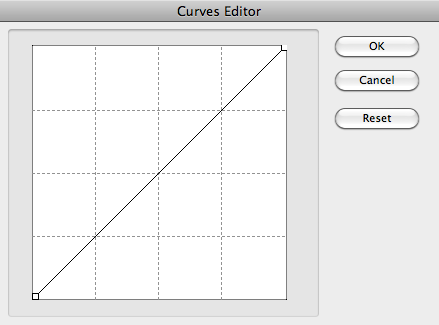 the highlights, midtones and shadows within the image tend to shift. To repair or adjust these to your liking, just click the Edit Tone button which will launch the tone curves editor.
Once launched, a small box will appear with a diagonal line which represents the tonal range of the image. To adjust the highlights, simply click and drag the end point on the upper right corner of the line and move it where desired. To adjust shadow tones, click the end point on the lower left hand corner of the line and move to where desired. You'll notice as the line changes, the preview to the right adjusts in realtime to show how your adjustments change the image.
At any time you can adjust any value in between the highlight and shadow tones by simply clicking on the diagonal line at anywhere which will automatically create a point you can then drag to the desired position. At any time, the point may be moved by clicking and dragging. To remove a point, simply hold down the Command (Apple) key (or the Ctrl key on Windows) then click the point you'd like to remove. If you decide to start over, simply click the reset button to the right, otherwise click the OK button to apply your changes or the Cancel button to close the window without adjusting the tone. - Tonal Color Swatches - Just to the right of the Edit Tone button are two color swatches that become enabled when the Use Tonal Film checkbox has been selected. To adjust, simply click either to launch the swatch color picker and click OK once you've selected your desired colors. Select two different tones if you want to make an authentic duotone image or make both tones the same color for a single tonal color effect.
Adjust the Film Grain
Nothing makes a vintage photograph look more authentic than film grain and Retrographer gives you an infinite variety of options to create or match original film types.
- Select Your Film Grain - Simply click the dropdown box to select the film grain you'd like to apply to you image or select No Film Grain to remove the effect. All other film grain controls will remain disabled until a shape has been selected.
- Grain Scale - Increase the size of the film grain by sliding this control to the right or slide the control to the left when you wish to reduce the size of the grain. You may also simply enter a number in the text entry field to the right for precise control.
- Grain Intensity - Increase or fade the strength of the film grain by moving the slider control or by simply entering a number in the text entry field to the right.
- Grain Smoothness - Sharpen or blur the film grain by moving the slider control or by simply entering a number in the text entry field to the right.
User Created Films - The User Created Films dialog allows you to save or apply previously saved film settings to the image you're working with, and we've created a pile of great films to get you started. Once you've created a film setting you like, click the Save button, name the setting and click OK to save this setting. To recall and apply a setting, simply click on the setting name in the dialog box. To delete a setting, simply click its name in the dialog box and click the Delete button.
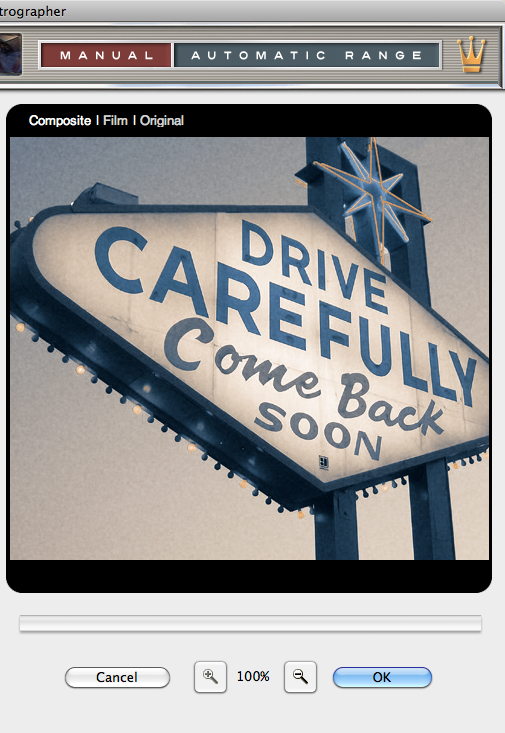
Working with the Preview Window
- Preview Options - Above the Preview window at right, you'll notice some viewing options. By default the Composite option is selected to show you what all combined tabbed section effects look like applied to the image. At any time you can click the Original option to toggle between the unaffected image and a preview of the filtered image with all effects applied or click the Film option to view just the Film applied to the image.
- Magnifying the Preview - Below the Preview window, you'll see the magnification controls. By clicking the appropriate icon (- or +), you can increase or decrease the magnification of the Preview window. The current level of magnification is shown between the magnification icons.
- Moving the Preview - When you have increased magnification and wish to view the texture effect on the rest of the image not visible in the Preview window, simply move your mouse into the Preview window and click and drag your image around to reveal the texture effected image.