Let's Learn About Retrographer
Lens : Distortion Settings
Happy accidents or artistic visions realized, lenses can make really cool photographic effects, so we created the Lens Distortion section when you really want to have some fun with your lenses. To access this section, simply click the Lens tab along the top of the UI, then the Lens Distortion tab just below.
|
Adjust the Chromatic Aberration
You may not be familiar with this big word, but you've definitely seen it! When the light rays coming into the camera lens break direction unexpectedly, each color lands at a different points on the image creating a wonderful effect.
- Aberration Offset - Click and drag anywhere on the shaded sphere control to change the direction of the chromatic aberration being applied to the image or simply enter your desired positions in the text entry fields next to the sphere.
- Aberration Opacity - Using the slider control, you can increase the opacity of the chromatic aberration by sliding it to the right or decrease the opacity of this effect by sliding it to the left.
- Aberration Scale - Increase the size of the chromatic aberration by sliding this control to the right or to the left when you wish to reduce the size of the effect.
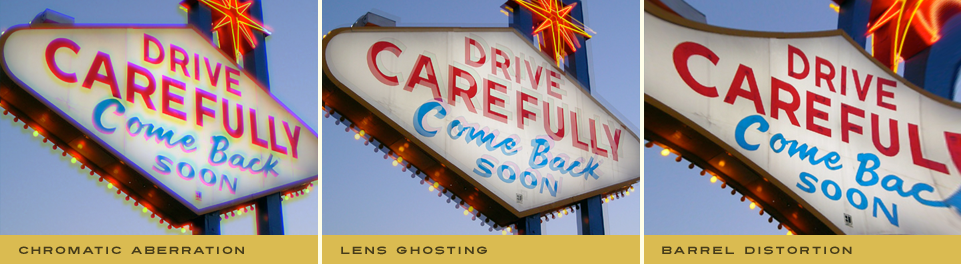
Adjust the Lens Ghosting
Sometimes lenses can create an accidental doubling of the image in the camera which is called ghosting. Use these controls to create and refine this wonderfully simple and delightfully expressive effect.
- Ghosting Offset - Click and drag anywhere on the shaded sphere control to change the direction and distance of the ghosting effect being applied to the image or simply enter your desired positions in the text entry fields next to the sphere.
- Ghosting Opacity - Using the slider control, you can increase the opacity of the ghosting effect by sliding it to the right or decrease the opacity of this effect by sliding it to the left.
- Ghosting Scale - Increase the size of the ghosting effect by sliding this control to the right or to the left when you wish to reduce the size of the effect.
Barrel Distortion
- Barrel Shape - Simply click the dropdown box to select the shape of the barrel distortion you'd like to apply to you image or select No Barrel to remove the effect. All other barrel distortion controls will remain disabled until a shape has been selected.
- Barrel Curvature - Using the slider control, you can define the curvature of the barrel applying a convex or a concave effect to your image depending what direction you reposition the slider.
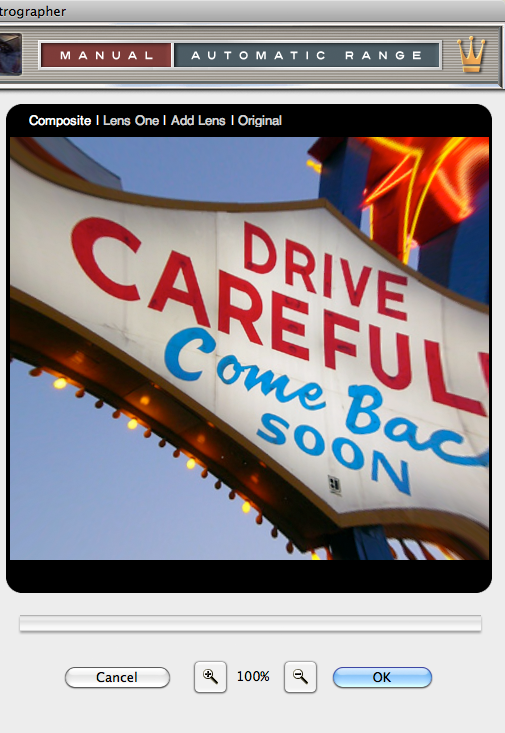
Working with the Preview Window
- Preview Options - Above the Preview window at right, you'll notice some viewing options. By default the Composite option is selected to show you what all combined tabbed section effects look like applied to the image. At any time you can click the Original option to toggle between the unaffected image and a preview of the filtered image with all effects applied.
- Preview Options - Lens Multiplier - By default you are only working with a single lens effect (Lens One), by clicking the Add Lens option, you can now define an additional lens effect with its own settings (Lens Two). You can easily toggle between each lens effect by clicking Lens One or Lens Two or click Composite to view the fully composited preview with both Lens effects applied in addition to all combined tabbed section effects. At any time you can delete either lens effect by clicking the red close box icon to the right of the lens name.
- Magnifying the Preview - Below the Preview window, you'll see the magnification controls. By clicking the appropriate icon (- or +), you can increase or decrease the magnification of the Preview window. The current level of magnification is shown between the magnification icons.
- Moving the Preview - When you have increased magnification and wish to view the texture effect on the rest of the image not visible in the Preview window, simply move your mouse into the Preview window and click and drag your image around to reveal the texture effected image.
- Re-positioning the Lens Effect - To modify the position of the lens effect on your image, hold down the Command (Apple) key (or the Ctrl key on Windows) then click and drag the crosshair icon within the Preview window to adjust the center of the effect.