Let's Learn About Spot Wash : Dirt
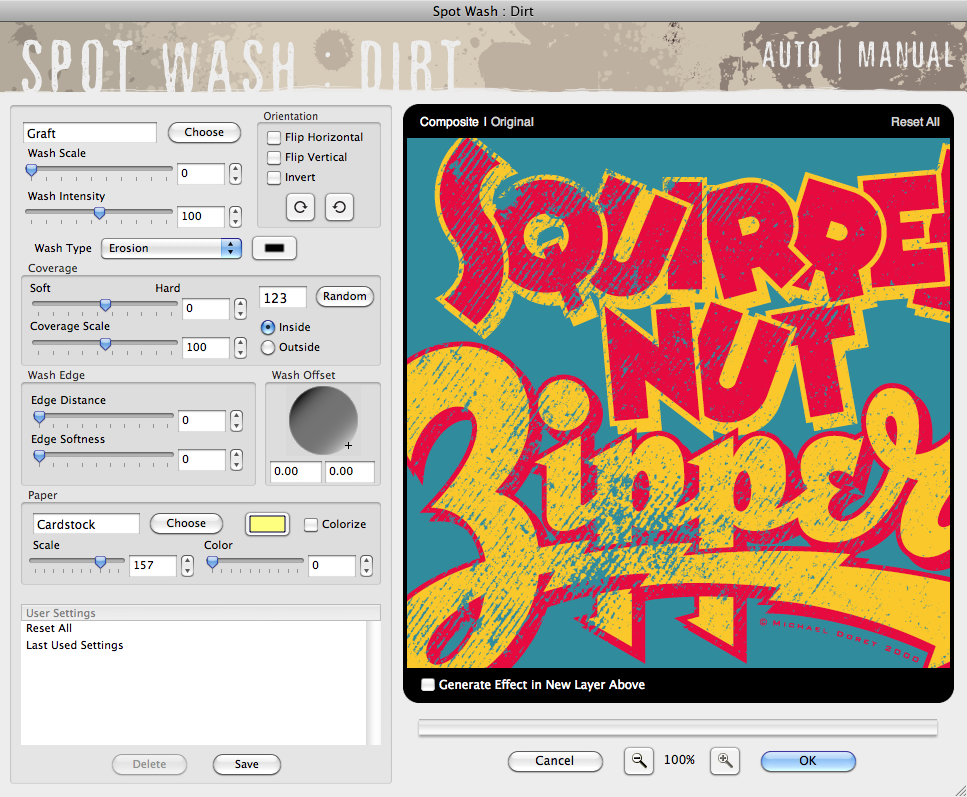
Spot Wash : Dirt Wash Settings
Spot Wash : Dirt first performs calculations on the image and applies either the default settings or the Last Used Settings to the loaded image. Let's look specifically at the Wash settings to see how quickly and easy it is to create and apply the basic Wash effect, then we'll look at ways to refine this with both the Coverage and Paper effects!

|
Select a Wash Texture
- Choose a Wash Texture Effect - To get started, you'll need to choose the texture you'd like to start working with. To do so, simply click the Choose button at the top to launch the Texture Picker. Once you've selected the desired texture you'd like to use, you can proceed to fine-tune using the plug-in controls. Additionally, you can select a different texture effect at any time and your current settings will be applied to the new texture.
|
Adjust the Wash Properties
We've given you the ability to adjust exactly how the Wash is applied to your image for even more versatility.
- Wash Scale - Using the slider control, you may enlarge or reduce the scale of the selected texture effect appropriate to the resolution of the image by moving the arrow below or simply enter a number in the text entry field to the right. By default the texture effect is applied at the smallest scale to the image.
- Wash Intensity - You may intensify or fade the texture effect by moving the slider control or by simply entering a number in the text entry field to the right.
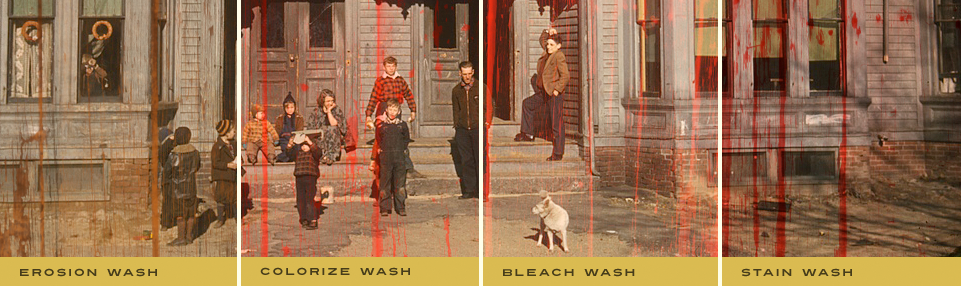
- Wash Type - Spot Wash : Dirt comes with four amazing Wash effect types for you to apply to your images:
- Erosion Wash - Erosion is selected by default and is used when you wish to subtract a texture from your image to reveal the Paper or layer beneath.
- Stain Wash - Select Stain when you want to apply the texture effect as a stain multiplied on top of your image. When this option is selected, use the color picker to the right to choose your stain color for the texture.
- Bleach Wash - Lighten and brighten your image where the texture effect overlays your image with the Bleach Wash type. When this option is selected, use the color picker to the right to choose your desired bleach color.
- Color Wash - Colorize the Wash texture effect applied to your image by selecting Color Wash. When this option is selected, use the color picker to the right to choose your new texture color.
|
Adjust the Wash Orientation
- Flip Horizontal - Click the checkbox to flip the texture effect horizontally.
- Flip Vertical - Click the checkbox to flip the texture effect vertically.
- Invert Wash - Click the Invert checkbox to inverse the texture effect.
- Rotate - Click either rotate button to rotate the texture effect in 90 degree increments.
Working with the Preview Window
- Preview Options - Above the preview window at left, you'll notice some viewing options. By default the Composite option is selected to show you all Spot Wash : Dirt effects applied to the image. At any time you can click the Original option to toggle between the unaffected image and a preview of the filtered image with the effects applied.
- Reset All - Reset All is located above the preview window on the right. When clicked, it will reset all effects to their default state.
- Magnifying the Preview - Below the preview window, you'll see the magnification controls. By clicking the appropriate icon (- or +), you can decrease or increase the magnification of the preview window. The current level of magnification is shown between the magnification icons. If you prefer keyboard shortcuts, you can simply hold down the Command (Apple) key (or the Ctrl key on Windows) then press the plus sign (+) or the minus sign (-) respectively to zoom in or out of your image.
- Moving the Preview - When you have increased magnification and wish to view the texture effect on the rest of the image not visible in the preview window, simply move your mouse into the preview window and click and drag your image around to reveal the effect on your image.
- Generate Effect in New Layer Above* - Simply enable this option if you want the plug-in to duplicate your original image and apply the filtered version on a new layer above the original image leaving it intact.
* NOTE - This option is only displayed in certain versions of Adobe Photoshop and other imaging applications that support layering and automation.
Pro Tip - Adobe Photoshop users may use keyboard shortcuts to instantly change the zoom magnification. To fit the full image within the preview window, simply hold down the Command (Apple) key (or the Ctrl key on Windows) then press the number zero (0) on the keyboard. To view the image at 100% size, hold down the Command (Apple) key (or the Ctrl key on Windows) then press the number one (1) on the keyboard.