Let's Learn About Spot Wash : Dirt
Spot Wash : Dirt Wash Coverage Settings
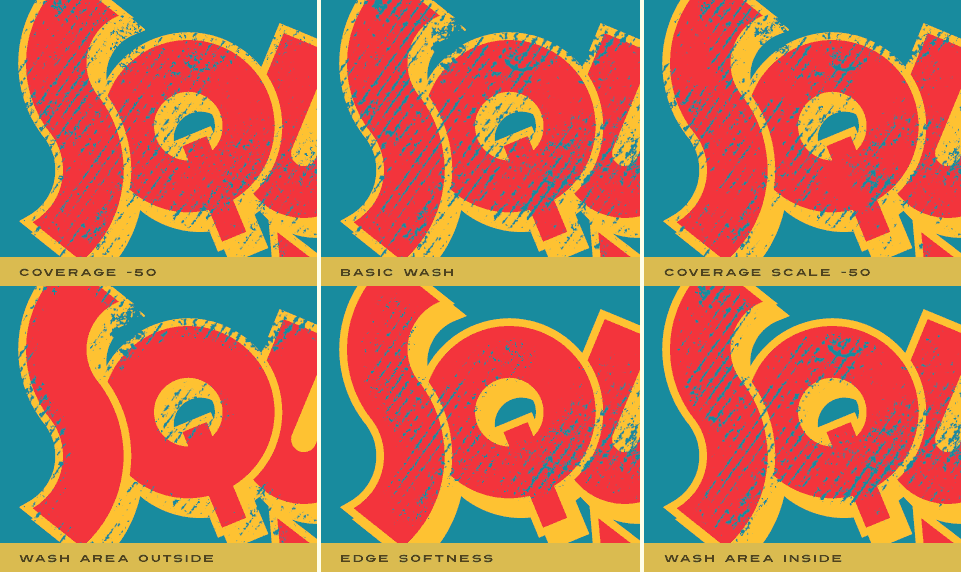
Now that you've applied the Wash effect to your image, let's take it to the next level by adjusting the Coverage settings to create a more authentic and realistic look!
Adjust the Wash Coverage
- Coverage - Using the slider control, you can modify the areas of your design that the texture effect is applied to. The Coverage slider by default is set to zero for full texture effect coverage with no gaps, as the coverage gap amount is increased in either direction, random gaps of the texture effect will be removed.
- Hard Coverage - Move the slider to the right to create gaps with a more abrupt edge between the Wash effect and the image.
- Soft Coverage - Move the slider to the left to create gaps with a softer edge between the Wash effect and the image.
- Coverage Scale - When the Coverage Scale slider has been adjusted to any amount above or below zero, the size of the visible patches in the applied texture effect will be decreased accordingly.
- Random Button - When the Coverage slider has been enabled, use the Random button to modify the position and shape of the patches created by the reduced coverage area. Either click on the Random button to generate a random number or manually type any number in the text field you wish to use.
- Edge Distance - As the Edge Distance slider control is increased, the texture effect will retract from the edge of the image or image selection depending on the Wash Area settings defined. By default, the Edge Distance control is set to zero meaning the texture effect is applied to the entire image.
- Edge Softness - Use the Edge Softness slider to soften or sharpen the transition from the edge of the texture effected area to the unaffected area of the image.
- Wash Offset - You can easily reposition the Wash effect on your image after it has been enlarged in the Wash Scale control. Simply click and drag the plus '+' sign in the shaded sphere to offset the Wash texture, type the desired X and Y coordinates in the boxes beneath or simply hold down the Command (Apple) key (or the Ctrl key on Windows) key and click and drag the Wash texture effect in the preview window to change its position.
|
Adjust the Wash Area
These controls only affect the image when the coverage of the texture effect has been modified using the Edge Distance and Edge Softness controls.
- Inside - Toggle the Inside radio button to apply the texture effect to the inside of the image. Use this feature in tandem with the Edge Distance control to enhance the effect of the Wash near the edges of your images. Inside is always selected by default.
- Outside - Toggle the Outside radio button to apply the texture effect from the edges to the outside of the image. Use this feature in tandem with the Edge Distance control to enhance the effect of the Wash near the edges of your images.
Working with the Preview Window
- Preview Options - Above the preview window at left, you'll notice some viewing options. By default the Composite option is selected to show you all Spot Wash : Dirt effects applied to the image. At any time you can click the Original option to toggle between the unaffected image and a preview of the filtered image with the effects applied.
- Reset All - Reset All is located above the preview window on the right. When clicked, it will reset all effects to their default state.
- Magnifying the Preview - Below the preview window, you'll see the magnification controls. By clicking the appropriate icon (- or +), you can decrease or increase the magnification of the preview window. The current level of magnification is shown between the magnification icons. If you prefer keyboard shortcuts, you can simply hold down the Command (Apple) key (or the Ctrl key on Windows) then press the plus sign (+) or the minus sign (-) respectively to zoom in or out of your image.
- Moving the Preview - When you have increased magnification and wish to view the texture effect on the rest of the image not visible in the preview window, simply move your mouse into the preview window and click and drag your image around to reveal the effect on your image.
- Generate Effect in New Layer Above* - Simply enable this option if you want the plug-in to duplicate your original image and apply the filtered version on a new layer above the original image leaving it intact.
* NOTE - This option is only displayed in certain versions of Adobe Photoshop and other imaging applications that support layering and automation.
Pro Tip - Adobe Photoshop users may use keyboard shortcuts to instantly change the zoom magnification. To fit the full image within the preview window, simply hold down the Command (Apple) key (or the Ctrl key on Windows) then press the number zero (0) on the keyboard. To view the image at 100% size, hold down the Command (Apple) key (or the Ctrl key on Windows) then press the number one (1) on the keyboard.