


|
Ink Settings Once you've defined the Basic settings, you can further fine tune the color or Ink Plate settings in this section.
Ink Color Settings - Click the eyedropper icon on the left to select a color from anywhere on the desktop to change the Ink Plate color to or simply select the color picker icon on the right to define a color you wish to use for a specific Ink Plate. You'll note the current Ink Plate color is identified in the area between these two icons. In the Palette color mode, you can even lock specific colors you wish to keep by clicking the lock icon to the right of color picker icon. Any Ink Plates that have been locked are identified in the Ink Plate drop down box at the top of the interface with a small icon in the lower right hand corner. To unlock an Ink Plate color, simply select the Ink Plate from the drop down menu at top and click the lock icon. When working with the plug-in, you may find that not only do you want to work with a fixed amount of Ink colors, but you also want them to be very specific colors. The lock feature makes this easy. In the Basic tabbed section, define the number of colors you wish to use in Palette Mode, then in the Ink tabbed section, adjust and lock the colors you wish to keep and return to the Basic tabbed section. Adjust the Number of Inks again to watch the plug-in reconstruct the color palette using your locked colors. Ink Viscosity - Below the Ink Color dialog is the Ink Viscosity dialog which defines how wet the ink is. Wetter ink will spread and drier ink will result in less coverage. You'll also notice there is an Apply Globally checkbox just beneath that is visible elsewhere in the interface which allows you to apply the same settings to ALL Ink Plates rather just the one you're working with. 
In the example above in the center, you can see how the viscosity has been applied globally to all Ink Plates resulting in a loss of detail and an increase in overprinted Ink. If we look above to the far right, we've only modified the viscosity of a single Ink Plate (Blue) while leaving the remaining Ink Plates intact. Ink Texture - Beneath that is the Ink Texture dialog which will apply a resulting surface texture to any Ink Plate that you're working with. It's easy to select an Ink Texture from the drop down box or simply select No Texture if you wish to work with solid colors only. 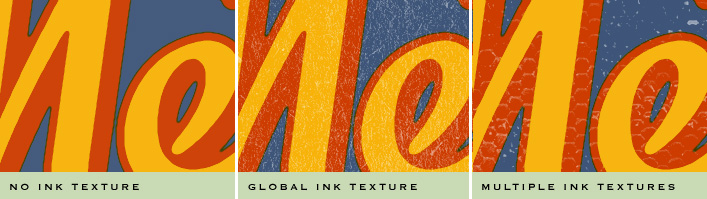
In the example above, you'll note Ink Textures can be applied globally to all Ink Plates simultaneously or applied to each individual Ink Plate making it easy to combine Ink Texture effects or to alternate Ink Plates without Ink Textures. Another great feature of Permanent Press is that you can create and apply your own tileable textures and since we continue to release new textures all the time, you can download them as they're added right from the About dialog by clicking the Permanent Press title at the top of the GUI. You can read more about creating your own textures or downloading new textures in our Advanced Techniques section. Ink Texture Scale & Intensity - Use these controls to change the scale of the ink texture as well as the intensity of the texture effect depending on your preference. Click Here to learn about Plate Settings . . . |