

|
Press Effects Settings The final Permanent Press setting you can adjust is the Press Effects tabbed section which creates the authentic tactile effect of vintage offset printing.
Let's begin by explaining the Edge Effect controls lower in the GUI and then revisit the Pressure Effects controls at the top of the GUI. The Edge Effect controls allow you to adjust the look of each Ink Plate where the ink comes to its natural edge. There are multiple effects that combine to create the realistic look of genuine offset press printing and we consider the Press Effects settings to be the hallmark of the Permanent Press aesthetic. Edge Roughness - Only after you've increased the Edge Thickness, you can then adjust the smoothness or roughness of the edge of any Ink Plate using this slider control. 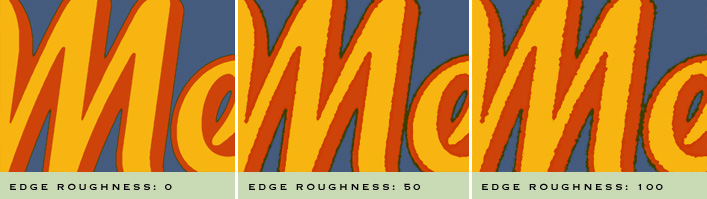
Edge Thickness - The thickness of any edge can be adjusted as desired but you'll notice this control on its own doesn't produce an obvious result. Edge thickness is used in tandem with all the Edge Effect and Press Pressure controls and is most noticeable when Edge Roughness is increased, Press Pressure is decreased, or if Edge Starve opacity is reduced. What is Edge Starve? - Imagine a freshly inked printing press plate coming down on a sheet of paper with a mighty force to press an image. Each time the plate is lifted off the sheet, the ink is drawn back to the plate and simultaneously pools in the center and the edges of the printed image. The area between these two is left under inked and appears visually lighter sometimes referred to as the Edge Starve area. Edge Starve Width & Opacity - This Edge Starve Width control allows you to define the Edge Starve between the natural edge of the image and the fill area. Once you've defined the Edge Starve Width, you can adjust the opacity of the Edge Starve to your liking. 
The Edge Effect controls really allow a significant range of visual effects but add Pressure Effects to the mix and you virtually double the amount of visual effects in the plug-in. Pressure Effects - The Pressure Effects controls at the top of the GUI control the direction the plate is coming down onto the surface of the paper as well as the force. Either by typing in a number or by clicking and dragging the highlight on the sphere control, you can adjust the direction the pressure is strongest. As you may expect, the ink edges will respond to changes in the direction of pressure and adjust accordingly producing a very convincing effect. 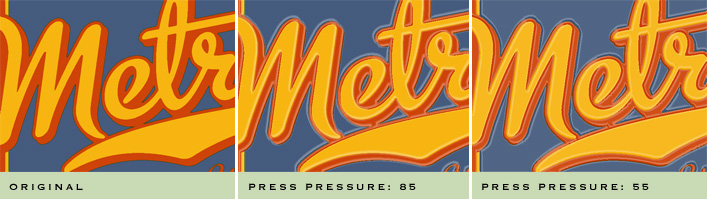
Press Pressure - Using the Press Pressure slider control, you can also adjust the pressure of the plate on the paper surface and affect ink coverage as well. The more pressure, the darker the ink, the less pressure, the lighter the ink. By default, the Press Pressure control is set to 85 which we consider standard. Once you've mastered the basics, click Here to learn some Advanced Techniques . . . |