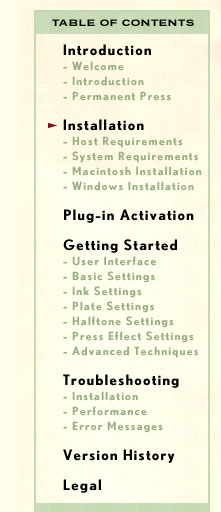
Host Requirements
This is a plug-in; you must use it with a compatible host program.
Physical Size Requirements on Hard Drive (in Megabytes)
Plug-in and related files - Less than 6 MB
Macintosh Hosts
Adobe Photoshop CS2, CS3 or later
Adobe Creative Elements 4.0 or later
Windows Hosts
Adobe Photoshop CS2, CS3 or later*
Adobe Creative Elements 4.0 or later
System Requirements
Macintosh Systems
Mac OS X 10.2.6 or later
PowerPC or Intel processor
At least 256 megabytes of RAM, 1 Gigabyte of RAM recommended
12-bit (4096) display color; true color (16.7M colors) recommended
640 x 480 display resolution; 800 x 600 or better recommended
Windows Systems
Windows OS 2000, XP, Vista32 and 64 or later*
1.2 GHz Pentium processor or higher
At least 256 megabytes of RAM, 1 Gigabyte of RAM recommended
16-bit (65535 colors) display color; true color (16.7M colors) recommended
640 x 480 display resolution; 800 x 600 or better recommended
* Windows Plug-in is also compatible with earlier Windows and Adobe releases as well as the following image editing applications: ACD PhotoEditor, Corel Photo-Paint 13, Corel PaintShopProX, Just PaintShopPro 8, Xara Picture Editor 3, GIMP 2, Ulead PhotoImpact and Macromedia Fireworks 8
Macintosh Installation
Use the following instructions to install the Permanent Press filter:
Shut down your graphics host program.
Note:
To install the Permanent Press filter, your OS X user account must have administrator privileges. For information on configuring your user account for administrator privileges, talk to your IT person or consult your OS X user manual.
Locate the installation program that you downloaded from the online store and double-click to unzip.
Double-click the Installer icon.
Click Continue.
Read the License Agreement.
Click Accept.
Photoshop users:
Highlight <Drive> / Applications / Adobe Photoshop (CS2 or CS3) / Plug-ins and click OK to install the Permanent Press filter. The installer will attempt to locate the Photoshop plug-ins folder and install the Permanent Press filter there.
Elements users:
Highlight <Drive> / Applications / Adobe Photoshop Elements (4 or higher) / Plug-ins and click OK to install the Permanent Press filter. The installer will attempt to find the Photoshop plug-ins folder and install the Permanent Press filter there.
If the installer does not find the plug-ins folder: Click the Choose another install location button. Locate your plug-in folder. If you do not choose the proper folder, the filters will not show up in your Filters menu.
Note:
If you are not sure where to install the Permanent Press filter, consult your graphics program user manual.
Highlight the folder and click the Choose button to return to the main installation screen. The installer copies the files to your hard disk. Rerun the installer if you wish to install the Permanent Press filter into other graphics programs.
Start Photoshop, open the image you'd like to start working with, then in the application menu select Filters > Mister Retro > Permanent Press to begin.
You will need to register and activate the plug-in before your first use.
Click Here to Learn about
Registration and Activation
. . .
Windows Installation
Use the following instructions to install the Permanent Press filter:
Shut down your graphics host program.
Note:
To install the Permanent Press filter, your Windows 2000, XP or Vista user account must have administrator privileges. For information on configuring your user account for administrator privileges, talk to your IT person or consult your user manual.
Locate the installation program that you downloaded from the online store.
Double-click the PP_Install.exe icon.
Click Next.
Read the License Agreement.
Click Accept.
Click Next. The installer then will attempt to locate the latest Photoshop plug-ins folder and install the Permanent Press filter there.
Click Next to accept this location to install the plug-in OR Click Browse to change the desired plug-in folder location. Once you've located the folder you'd like to install the plug-in at, click Next to accept this location and proceed with the installation.
Start Photoshop, open the image you'd like to start working with, then in the application menu select Filters > Mister Retro > Permanent Press to begin.
You will need to register and activate the plug-in before your first use.
Click Here to Learn about
Registration and Activation
. . .